Vitis-AI 应用软件的编译运行环境目前必须在 docker 容器中,未见到xilinx 官方在物理机中编译和运行的。
Installation
- Install Docker - if Docker not installed on your machine yet
- Ensure your linux user is in the group docker
- At least 100GB of disk space for the disk partition running Docker
- Clone the Vitis-AI repository to obtain the examples, reference code, and scripts.
安装docker
因为 Vitis-AI 的编译运行环境官方都是在docker容器中完成的,没有提供物理机的tutorial。
这步按照docker 官方的steps 安装即可
添加 docker 组
因为docker的大部分使用情况都要求 root 权限,都要加sudo ,而将自己的用户加入docker 组后,就不需要加sudo 就可以执行docker的命令了。这步也是docker 官方建议的(教程)。
硬盘空间要求
根目录 / 所在磁盘空间要求剩余容量100GB以上
clone vitis-ai 仓库
1
2
git clone --recurse-submodules https://github.com/Xilinx/Vitis-AI
cd Vitis-AI
一定要下载,里面包含了一系列基本的东西。
启动vitis-ai 编译运行环境
这里就是官方使用的容器,支持自己构建(git 仓库中提供了dockfile),也可以直接拉取官方做好的镜像、这里直接拉取官方做好的。
1
2
docker pull xilinx/vitis-ai-cpu:latest  		# 拉取
./docker_run.sh xilinx/vitis-ai-cpu:latest		# 运行
最后可以进入docker环境,(如果用户账户未加入docker组,需要以root 权限运行)
vck5000-加速卡模式
设置环境
在完成上文的installation后,参考:https://github.com/Xilinx/Vitis-AI/tree/master/setup/vck5000 完成xrt环境安装。
具体流程参考文档:x86-vck5000 env install
这个安装步骤是在物理中进行的,然后安装完后,重新启动vitis-ai 容器,并设置环境变量,这步很关键,编译和运行有些环境变量是一定要设好的,否则会运行失败。
1
2
3
4
5
6
7
8
9
10
11
# For 4PE 350Hz, you can select DPU IP via the following command.
source /workspace/setup/vck5000/setup.sh DPUCVDX8H_4pe_miscdwc

# For 6PE 350Hz with DWC, you can select DPU IP via the following command.
source /workspace/setup/vck5000/setup.sh DPUCVDX8H_6pe_dwc

# For 6PE 350Hz with MISC, you can select DPU IP via the following command.
source /workspace/setup/vck5000/setup.sh DPUCVDX8H_6PE_MISC

# For 8PE 350Hz, you can select DPU IP via the following command.
source /workspace/setup/vck5000/setup.sh DPUCVDX8H_8pe_normal
补充:如果是自己的xclbin文件,也一定要将xclbin文件放到 /opt/xilinx/overlaybins/ ,因为Vitis-AI的环境限制,这个在xilinx git 上其实提到了。
编译并运行demo-VART
ref: https://github.com/Xilinx/Vitis-AI/blob/master/examples/VART/README.md
Vitis AI Runtime directory structure introduction
1
2
3
4
5
6
7
8
9
10
11
12
13
14
15
16
17
18
19
20
21
22
23
24
25
26
27
28
29
30
31
32
VART
├── README.md
├── adas_detection
│   ├── build.sh
│   └── src
├── common
│   ├── common.cpp
│   └── common.h
├── inception_v1_mt_py
│   ├── inception_v1.py
│   └── words.txt
├── pose_detection
│   ├── build.sh
│   └── src
├── resnet50
│   ├── build.sh
│   ├── src
│   └── words.txt
├── resnet50_mt_py
│   ├── resnet50.py
│   └── words.txt
├── segmentation
│   ├── build.sh
│   └── src
├── squeezenet_pytorch
│   ├── build.sh
│   ├── src
│   └── words.txt
└── video_analysis
	├── build.sh
	└── src
Quick Start
此处为 VCK5000-PROD Versal Card。环境为:在vitis-ai容器中运行
Step1
Download the vitis_ai_runtime_r2.5.x_image_video.tar.gz package and unzip it.
1
2
3
cd /workspace/examples
sudo wget https://www.xilinx.com/bin/public/openDownload?filename=vitis_ai_runtime_r2.5.0_image_video.tar.gz -O vitis_ai_runtime_r2.5.0_image_video.tar.gz
sudo tar -xzvf vitis_ai_runtime_r2.5.0_image_video.tar.gz -C VART
下载好 VART 的demo 用的一些示例图片,视频,文字等素材,给后面识别做准备。解压出来,补充到examples的VART demo 文件夹中,用来提供输入素材。
Step2
Download the model. For each model, there will be a yaml file which is used for describe all the details about the model. In the yaml, you will find the model’s download links for different platforms. Please choose the corresponding model and download it. Click Xilinx AI Model Zoo to view all the models. Take resnet50 yaml file as an example.
1
2
3
4
5
6
7
8
9
10
# If the /usr/share/vitis_ai_library/models folder does not exist, create it first.
# 这个也是在容器中的,这里会和物理机分开,就是物理机中没有,容器中单独有
sudo mkdir /usr/share/vitis_ai_library/models

# 我这里下载vck5000对应的示例,这里选了一个6pe-aieDWC 的 DPU
Vitis-AI /workspace/examples > sudo wget https://www.xilinx.com/bin/public/openDownload?filename=resnet50-vck5000-DPUCVDX8H-6pe-aieDWC-r2.5.0.tar.gz -O resnet50-vck5000-DPUCVDX8H-6pe-aieDWC-r2.5.0.tar.gz

# 按要求解压并复制到路径,这个路径应该在环境变量中有被设置,放到一个统一的地方
Vitis-AI /workspace/examples > sudo tar xzvf ./resnet50-vck5000-DPUCVDX8H-6pe-aieDWC-r2.5.0.tar.gz
Vitis-AI /workspace/examples > sudo cp resnet50 /usr/share/vitis_ai_library/models/ -r
Step3
Compile the sample, take resnet50 as an example.
1
2
3
   # 都是在 container 中执行
   cd /workspace/examples/VART/resnet50      # 这里可以查看demo 的src code
   sudo bash -x build.sh
编译完后生成 resnet50 可执行文件。(g++ ……… -o resnet50)
Step4
Run the example, take VCK5000 platform as an example.
1
./resnet50 /usr/share/vitis_ai_library/models/resnet50/resnet50.xmodel
补充:如果用户账户未加入docker组,这里运行时不能加sudo , 因为前面source的环境变量是对用户的,若以sudo 执行,会切换到root执行, 这样环境变量就被切换了,所以要以之前设置环境变量的用户执行(source /workspace/setup/vck5000/setup.sh DPUCVDX8H_6pe_dwc)
1
2
3
4
5
6
7
8
9
10
11
12
# catch log
Vitis-AI /workspace/examples/VART/resnet50 >  ./resnet50 /usr/share/vitis_ai_library/models/resnet50/resnet50.xmodel
WARNING: Logging before InitGoogleLogging() is written to STDERR
I1024 02:32:18.119701   293 main.cc:292] create running for subgraph: subgraph_conv1

Image : 001.jpg
top[0] prob = 0.982662  name = brain coral
top[1] prob = 0.008502  name = coral reef
top[2] prob = 0.006621  name = jackfruit, jak, jack
top[3] prob = 0.000543  name = puffer, pufferfish, blowfish, globefish
top[4] prob = 0.000330  name = eel
识别成功。
编译并运行demo-Vitis-AI-Library
ref: https://github.com/Xilinx/Vitis-AI/blob/master/examples/Vitis-AI-Library/README.md
Introduction
The Vitis AI Library is a set of high-level libraries and APIs built for efficient AI inference with Deep-Learning Processor Unit (DPU). It is built based on the Vitis AI Runtime with Unified APIs, and it fully supports XRT 2022.1.
The Vitis AI Library provides an easy-to-use and unified interface by encapsulating many efficient and high-quality neural networks. This simplifies the use of deep-learning neural networks, even for users without knowledge of deep-learning or FPGAs.The Vitis AI Library allows users to focus more on the development of their applications, rather than the underlying hardware.
补充:从解释来看,Vitis-AI Library建立在VART(Vitis-AI Run Time)之上,对VART进一步上层封装,主要就是:对VART的AI基础模型训练之类的基础功能(如resnet,adas_detection,pose_dection,video_analysis等)进行应用封装,示例化为各种常见应用(如 人脸检测,车道检测,姿态检测等 各种AI实际应用场景),可以让不懂AI或FPGA的用户也能快速部署AI应用,focus on development of applications rather than hardware or AI.(Xilinx有提供一些训练好的模型给examples)
Directory Structure Introduction
1
2
3
4
5
6
7
8
9
10
11
12
13
14
15
16
17
18
19
20
21
22
23
24
25
26
27
28
29
30
31
32
33
34
35
36
37
38
39
40
41
42
43
44
45
46
47
48
49
50
51
52
53
54
55
56
57
58
59
Vitis_AI_Library
├── apps
│   ├── multitask_v3_quad_windows
│   ├── seg_and_pose_detect
│   ├── segs_and_roadline_detect
│   ├── vck190_4mipi
│   └── vck190_4video
├── README.md
└── samples
    ├── 3Dsegmentation
    ├── bcc
    ├── c2d2_lite
    ├── centerpoint
    ├── classification
    ├── clocs
    ├── covid19segmentation
    ├── dpu_task
    ├── efficientdet_d2
    ├── facedetect
    ├── facefeature
    ├── facelandmark
    ├── facequality5pt
    ├── fairmot
    ├── graph_runner
    ├── hourglass
    ├── lanedetect
    ├── medicaldetection
    ├── medicalsegcell
    ├── medicalsegmentation
    ├── multitask
    ├── multitaskv3
    ├── ocr
    ├── ofa_yolo
    ├── openpose
    ├── platedetect
    ├── platenum
    ├── pmg
    ├── pointpainting
    ├── pointpillars
    ├── pointpillars_nuscenes
    ├── polypsegmentation
    ├── posedetect
    ├── rcan
    ├── refinedet
    ├── reid
    ├── retinaface
    ├── RGBDsegmentation
    ├── segmentation
    ├── solo
    ├── ssd
    ├── textmountain
    ├── tfssd
    ├── ultrafast
    ├── vehicleclassification
    ├── yolov2
    ├── yolov3
    ├── yolov4
    └── yolovx
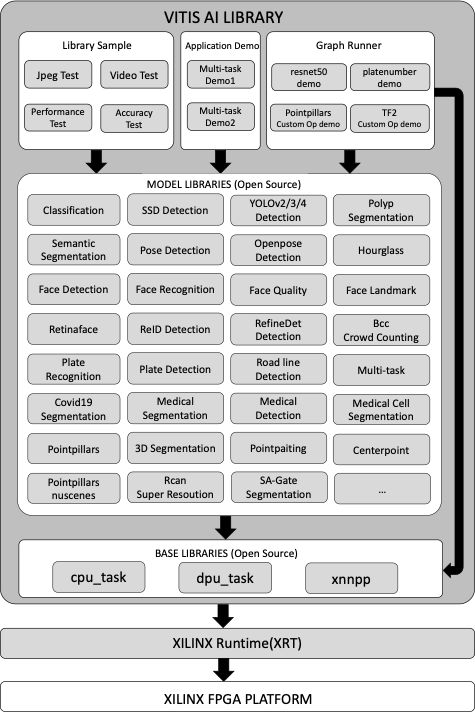
Block Diagram
Quick Start
Vitis-Ai Library 同时支持嵌入式环境和服务器加速卡环境,这里使用x86加速卡环境,VCK5000-PROD card
example reference:https://github.com/Xilinx/Vitis-AI/blob/master/src/Vitis-AI-Library/README.md#idu50
Step1
运行vitis-ai 编译和运行的容器,source 一下目标板的环境,然后进入Vitis-AI-Library示例所在目录
For each model, there will be a yaml file which is used for describe all the details about the model. In the yaml, you will find the model’s download links for different platforms. Please choose the corresponding model and download it. Click Xilinx AI Model Zoo to view all the models. Take resnet50 yaml file as an example.
1
2
3
4
5
6
7
8
9
10
11
12
cd <path-to-Vitis-AI>/Vitis-AI
su root		# 未加入docker组,以root运行
./docker_run.sh xilinx/vitis-ai-cpu:latest     # 同意许可
# 进入了 Vitis-AI /workspace >  容器环境
source /workspace/setup/vck5000/setup.sh DPUCVDX8H_6pe_dwc  # 继续使用之前下载的6pe_dwc
cd /workspace/examples/Vitis-AI-Library/
sudo mkdir -p /usr/share/vitis_ai_library/models   # 容器特性,重新运行容器后,之前的不会保存

# 下载对应该DPU的模型,(xilinx 训练好的模型,以及配置文件),按照示例下载resnet50训练模型
sudo wget https://www.xilinx.com/bin/public/openDownload?filename=resnet50-vck5000-DPUCVDX8H-6pe-aieDWC-r2.5.0.tar.gz -O resnet50-vck5000-DPUCVDX8H-6pe-aieDWC-r2.5.0.tar.gz
sudo  tar -xzvf resnet50-vck5000-DPUCVDX8H-6pe-aieDWC-r2.5.0.tar.gz
sudo cp resnet50 /usr/share/vitis_ai_library/models -r
Step2
Download the vitis_ai_library_r2.5.x_images.tar.gz and vitis_ai_library_r2.5.x_video.tar.gz packages and untar them.
这里下载的应是等会儿demo程序要测试的 图片和视频
1
2
3
4
5
cd /workspace
sudo wget https://www.xilinx.com/bin/public/openDownload?filename=vitis_ai_library_r2.5.0_images.tar.gz -O vitis_ai_library_r2.5.0_images.tar.gz
sudo wget https://www.xilinx.com/bin/public/openDownload?filename=vitis_ai_library_r2.5.0_video.tar.gz -O vitis_ai_library_r2.5.0_video.tar.gz
sudo tar -xzvf vitis_ai_library_r2.5.0_images.tar.gz -C examples/Vitis-AI-Library/
sudo tar -xzvf vitis_ai_library_r2.5.0_video.tar.gz -C examples/Vitis-AI-Library/
Step3
编译demo程序
1
2
cd /workspace/examples/Vitis-AI-Library/samples/classification
sudo bash -x build.sh
生成了好几个可执行文件
Step4
运行测试程序demo。(source在Step1 已设置好)
1
2
./test_jpeg_classification resnet50 sample_classification.jpg
Step5
Run the video test example.(该demo程序需要图形化展示,需要图形界面,略过)
1
2
3
4
5
6
# ./test_video_classification resnet50 <video_input.mp4> -t 8

# Video_input.mp4: The video file's name for input. The user needs to prepare the video file by themselves.
# -t: <num_of_threads>

./test_video_classification resnet50 /workspace/examples/VART/pose_detection/video/pose.mp4 -t 8
Step6
To test the performance of model, run the following command:
1
2
3
4
./test_performance_classification resnet50 test_performance_classification.list -t 8 -s 60

-t: <num_of_threads>
-s: <num_of_seconds>
Tools
In this release, xdputil tool is introduced for board developing. It’s preinstalled in the latest board image. The source code of xdputil is under usefultools.
xdputil 工具介绍,可以在Vitis-AI 容器环境中使用
- Show device information, including DPU, fingerprint and VAI version.
1
xdputil query
- Show the status of DPU
1
xdputil status
- Run DPU with the input file.
1
2
3
4
5
xdputil run <xmodel> [-i <subgraph_index>] <input_bin>

xmodel: The model run on DPU
-i : The subgraph_index of the model, index starts from 0, -1 means running the whole graph, the default value is 1
input_bin: The input file for the model
- Show xmodel information, including xmodel’s inputs&outputs and kernels
1
xdputil xmodel <xmodel> -l
- Convert xmodel to the other format
1
2
3
xdputil xmodel <xmodel> -t <TXT>
xdputil xmodel <xmodel> -s <SVG>
xdputil xmodel <xmodel> -p <PNG>
- Show the OP information
1
xdputil xmodel <xmodel> --op <OP name>
- Test xmodel performance
1
2
3
xdputil benchmark <xmodel> [-i subgraph_index] <num_of_threads>

-i : The subgraph_index of the model, index starts from 0, -1 means running the whole graph.
- Test custom Op
1
xdputil run_op <xmodel> <op_name> [-r REF_DIR] [-d DUMP_DIR]
For more usage of xdputil, execute xdputil -h.